FAQ: Ecotec cam install and cam timing - Page 2 - Performance Forum

Forum Post / Reply
You must log in before you can post or reply to messages.
Re: FAQ: Ecotec cam install and cam timing
Wednesday, June 28, 2006 7:19 PM
if you had the stage 2 cams and the hptuners or another piggyback system could you just tune out the code?


------------------------------------------------------------------
------------------------------------------------------------------
when you beat someone in a civic people wine and make excuses
when you beat someone in a cavalier they pull over and check under thier hoods

Re: FAQ: Ecotec cam install and cam timing
Wednesday, January 09, 2008 10:13 PM
blast from the past... lol.

Darkstars wrote:

, there is an off-centered key-way so it only fits on one way and do the other cam.


So there is a keyway on the 2.2L? The cam won't spin on the gear with the bolt loose?

I'm asking this because the 2.0L saab ecotec has no keyway.


Re: FAQ: Ecotec cam install and cam timing
Wednesday, January 09, 2008 10:20 PM
are you sure the Saab doesn't have a keyway? I have never in my life ever seen an OHC engine without them... hell or any engine for that matter.


Re: FAQ: Ecotec cam install and cam timing
Wednesday, January 09, 2008 10:36 PM
Here, these are the only pics I have of the Key keyways on the cams... you'll see what I'm talking about.


BTW this is not my engine, its someone elses that I took apart when it broke, my guess, cam gear bolt left loose after head swap. The gear spun the cam didn't ripped the keyway off and pisons banged valves.


end of the cam


destroyed gear


Normal cam gear


As you can see it is in fact offset, and only fits one way. It has to have some sort of keyway on everything because lining up timing marks on the engine is useless if the cam gear is aligned right on the cam.


Re: FAQ: Ecotec cam install and cam timing
Thursday, January 10, 2008 12:14 AM
Thanks for the pictures. Yeah the cam gears (on 2.0L saabs) have no keyway. To time it you have to set it to tdc by putting on cam caps (one on intake and one on exhaust) that go over the lobe of the cams also, This sets it to tdc. Then you take everything apart.

One guy at work left the bolts loose on the cam gears. Once he started it, it bent some valves


Re: FAQ: Ecotec cam install and cam timing
Thursday, January 10, 2008 5:53 AM
I don't understand what your getting at... you wouldn't time any motor without the cams bolted in... so you'd have the have the cam caps on. Every diamable instructions I've seen tells you to put the engine a TDC before taking it apart.

And again there has to be a key way or alighnment pin or somethign to keep the cam gear lined up on the cam.


Re: FAQ: Ecotec cam install and cam timing
Thursday, January 10, 2008 8:40 PM
I basically wanted to see if it was different from the 2.0L ecos I work with.


Re: FAQ: Ecotec cam install and cam timing
Thursday, January 10, 2008 11:05 PM
great write up Darkstars.......I am actually doing this as we speak to my engine....but my focus is more on the balancer shaft chain than the actual timing chain....

the balancer shaft chain (smaller chain) has 2 red links on it...thats all..no other colors...but I have been told there are 3 colored links...So I guess they are talking about the timing chain. I need to know where these 2 red links on the balancer shaft chain line up so I can get the timing assembly finished...

in the pic below, the BLUE line resembles the timing chain which drives the cam sprockets and crank sprocket and the RED line resembles the balancer shaft chain which runs the balance shafts and water pump.


the chain for it only has 2 red links nothing else....any info on installing this?

thanks for any info


PROUD MEMBER OF JBOK.

Re: FAQ: Ecotec cam install and cam timing
Friday, January 11, 2008 12:10 AM
sorry I just realized the RED line should go under the exhaust balance shaft (left) instead of over top of it.......

corrected picture


PROUD MEMBER OF JBOK.

Re: FAQ: Ecotec cam install and cam timing
Friday, January 11, 2008 11:59 AM
As far as the balance shaft chain. One chain mark lines up with a dot on the crankshaft sprocket. The other lines up with the arrow on the exhaust balance sprocket. when lining up the exhaust side, the arrow should also be lined up with a notch on the case. All four things have to be lined up together; exhaust sprocket arrow with exhaust side timing notch with one red link on the chain. Then the other red link should be lined up with the crank sprocket dot. Just make sure the #1 piston is at TDC when lining everything up, the timing chain has to be installed and timed right first. If you do it right the mark on the crank should be at around 5 o'clock with everything aligned.
Re: FAQ: Ecotec cam install and cam timing
Sunday, January 13, 2008 6:30 PM
darestie wrote:As far as the balance shaft chain. One chain mark lines up with a dot on the crankshaft sprocket. The other lines up with the arrow on the exhaust balance sprocket. when lining up the exhaust side, the arrow should also be lined up with a notch on the case. All four things have to be lined up together; exhaust sprocket arrow with exhaust side timing notch with one red link on the chain. Then the other red link should be lined up with the crank sprocket dot. Just make sure the #1 piston is at TDC when lining everything up, the timing chain has to be installed and timed right first. If you do it right the mark on the crank should be at around 5 o'clock with everything aligned.


Doesnt the accessory chain have to be installed first, because the accessory chain goes behind the timing chain...The timing chain overlaps the accessory chain....correct me if I am wrong please.

darestie wrote:exhaust sprocket arrow with exhaust side timing notch with one red link on the chain.


I dont think this is possible because the chain goes under the exhaust balance shaft and not over it....The timing notch is located on the top side of it at approx 1 o'clock......

any more info on this anyone?

thanks for any help


PROUD MEMBER OF JBOK.


Re: FAQ: Ecotec cam install and cam timing
Sunday, January 13, 2008 7:46 PM
Here is what I am saying...the pic below shows the timing housing....The BLUE dot shows the timing notch on the exhaust balance shaft bracket. This notch is not on the actual sprocket but is on the piece that bolts to the block...Once again the RED shows the path of the accessory chain and shows that it goes under the balance shaft rather than over it.....so how would you line up a link with the notch if they never meet?


PROUD MEMBER OF JBOK.

Re: FAQ: Ecotec cam install and cam timing
Monday, January 14, 2008 9:09 AM
bump for the afternoon crew.....any info on this guys?


PROUD MEMBER OF JBOK.

Re: FAQ: Ecotec cam install and cam timing
Monday, January 14, 2008 10:08 AM
You line up all the marks on the chain to the marks on the sprockets.
The notches on the holders have nothing to do with the timing.


Re: FAQ: Ecotec cam install and cam timing
Monday, January 14, 2008 10:50 AM
then where is the exhaust side timing notch? It has to be lined up with the arrow according to this

darestie wrote:exhaust sprocket arrow with exhaust side timing notch with one red link on the chain.


PROUD MEMBER OF JBOK.

Re: FAQ: Ecotec cam install and cam timing
Monday, January 14, 2008 1:10 PM
We did a cam install in my driveway not the long ago using your write-up. Also stage 2 cams. But the the whole cam gear disaster happend to us as well. Someone forgot to tighten the cam bolts before they reassembled everything and then when they turned it over the cam tore the teeth on the back right out. So we took it apart replaced the cam gears retimed the motor considering the cam timing was way off. Shifted came down and flashed a tune, and as far as I know the car is a whole new beast. Overall the write-up was great but there were a couple of snags that we hit that weren't really elaborated on. But we sorted them out.
Re: FAQ: Ecotec cam install and cam timing
Friday, January 18, 2008 6:36 PM
Tha01cav wrote:
darestie wrote:As far as the balance shaft chain. One chain mark lines up with a dot on the crankshaft sprocket. The other lines up with the arrow on the exhaust balance sprocket. when lining up the exhaust side, the arrow should also be lined up with a notch on the case. All four things have to be lined up together; exhaust sprocket arrow with exhaust side timing notch with one red link on the chain. Then the other red link should be lined up with the crank sprocket dot. Just make sure the #1 piston is at TDC when lining everything up, the timing chain has to be installed and timed right first. If you do it right the mark on the crank should be at around 5 o'clock with everything aligned.


Doesnt the accessory chain have to be installed first, because the accessory chain goes behind the timing chain...The timing chain overlaps the accessory chain....correct me if I am wrong please.

darestie wrote:exhaust sprocket arrow with exhaust side timing notch with one red link on the chain.


I dont think this is possible because the chain goes under the exhaust balance shaft and not over it....The timing notch is located on the top side of it at approx 1 o'clock......

any more info on this anyone?

thanks for any help


I am going off of the Haynes repair guide which shows that the exhaust timing notch is at the 6 o'clock position, which makes sense considering the chain goes underneath the exhaust sprocket, I don't know why yours would be different. Also the timing chain doesn't have to be installed , (my fault, I should have been clearer), Just make sure the crank is rotated to TDC for piston one and try not to let it move or you have to re-time the cams.
Re: FAQ: Ecotec cam install and cam timing
Friday, January 18, 2008 6:54 PM
Here I hope this helps.


Also just a note, the intake sprocket arrow also has to be aligned with a notch in the case but no link on the chain lines up with it.
Re: FAQ: Ecotec cam install and cam timing
Monday, February 14, 2011 9:56 PM
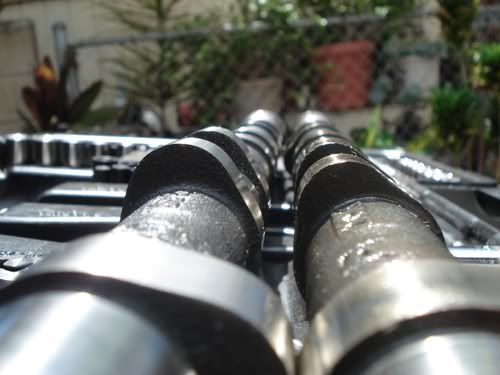
I reinstalled my stock cams after a good year and half with my comp stage 2 cams. (loved it) I put it back to stock since I dont race anymore and to save gas. These were pics of when I installed the comp stage 2s. Been meaning to post this for a long time. Hope this helps to those who need visual aid with darkstars awesome write up I used when I installed my cams. Not the best pictures taken but it should give you an idea on what you need to do.

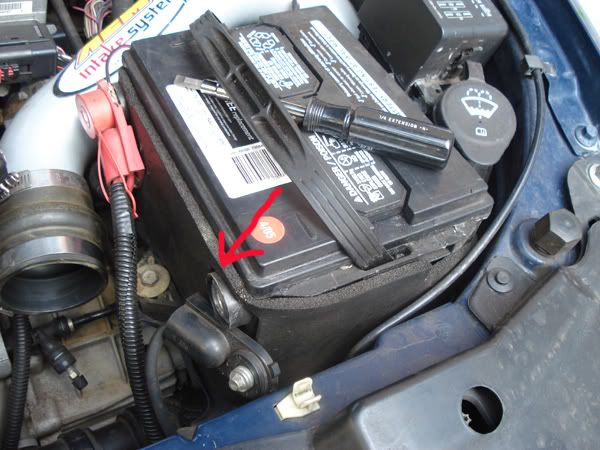
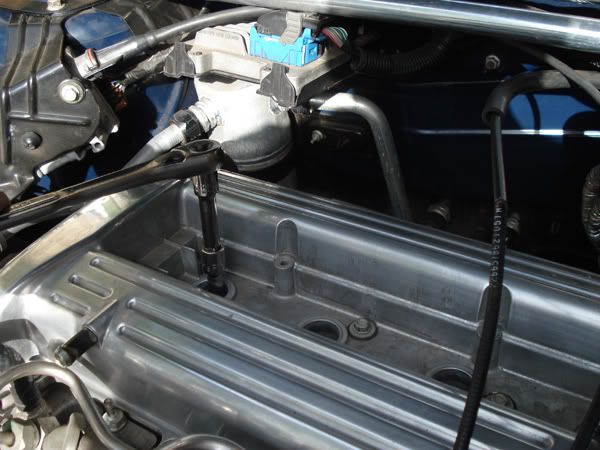
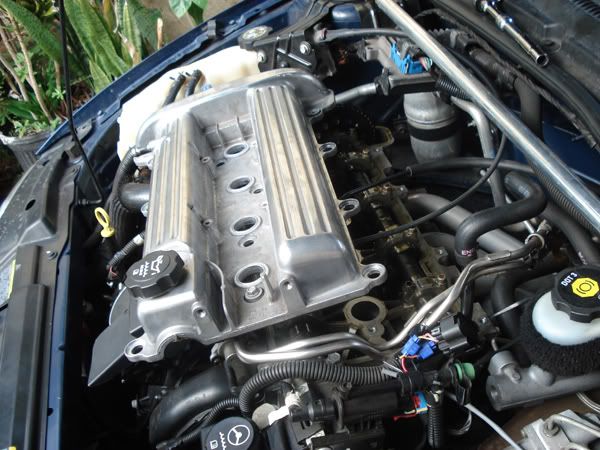
First from in the engine bay. Disconnect the battery, then remove the 2 nuts that hold the fuel lines to the valve cover on the drivers side of the engine, gently pull the fuel line away and over the studs, then remove the studs which hold on a ground strap and the throttle cable holder.


From there unplug the IDI cover and remove the 4 bolts that hold it in and the IDI cover itself.


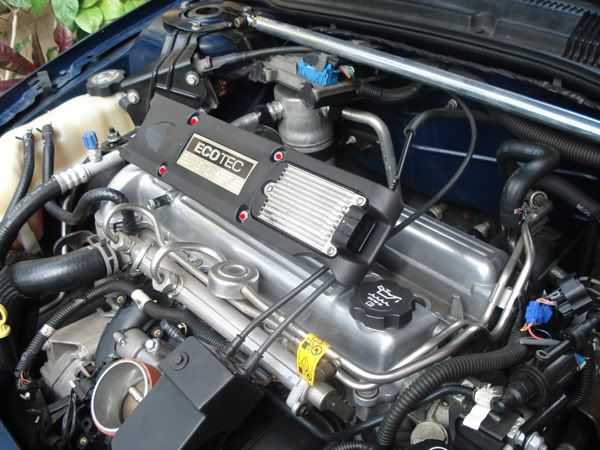
Once that is off remove all 4 of the spark plugs and the valve cover itself. Do not pry it off once the bolts are off because you could destroy the gasket, it will most likely stick if it does use a rubber mallet or a block of wood and GENTLY tap it off


Now from underneath the car. Raise the car and get the plastic cover in between the wheel and the engine off, its a couple push rivets and a few 7mm bolts I think it is.


Take the serpentine belt off, use a 3/8 drive ratchet there is a spot to put it in the tensioner, have the ratchet set to off and pull the tensioner back and it will release tension from the belt, then just slide the belt off.


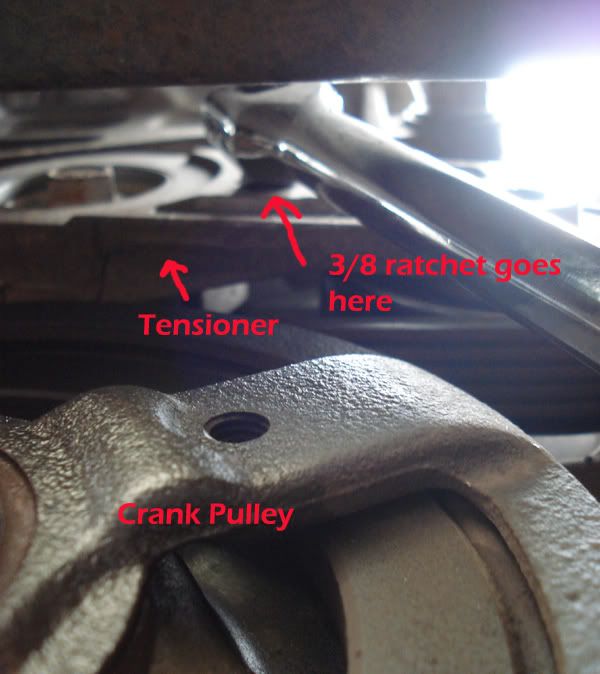
Next step is to remove the crank pulley, I forget what size bolt it is (21MM) but either use an impact to take it off, or stick a screwdriver through one of the pulley holes to keep it from spinning. If your trying to remove it without air tools its easier with the spark plugs still in the car, another way you could try is using the belt as a strap wrench around the pulley to keep the crank from spinning while your loosening the bolt, once its loose just slide a screw driver under it and it will pop/slide right off (you do not need a pulley puller to get it off, it is not pressed on). Put the crank pulley bolt NOT the pulley itself just the bolt back in the crank.
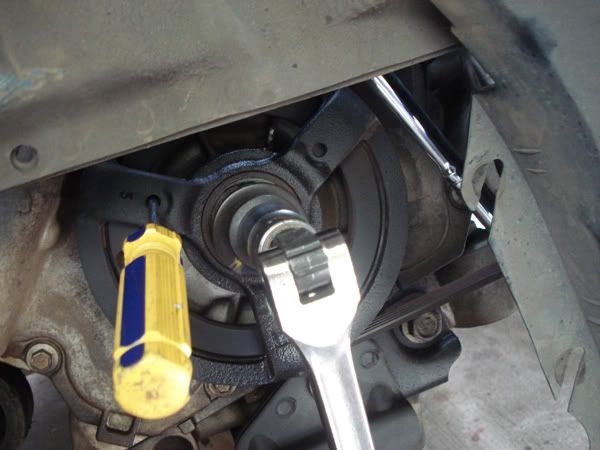
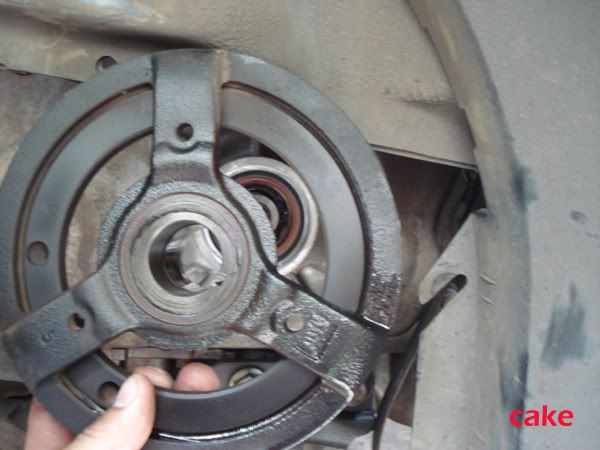

Yup, easy as cake

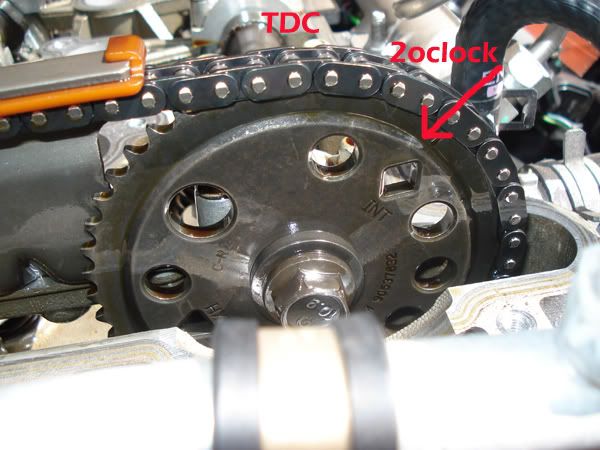
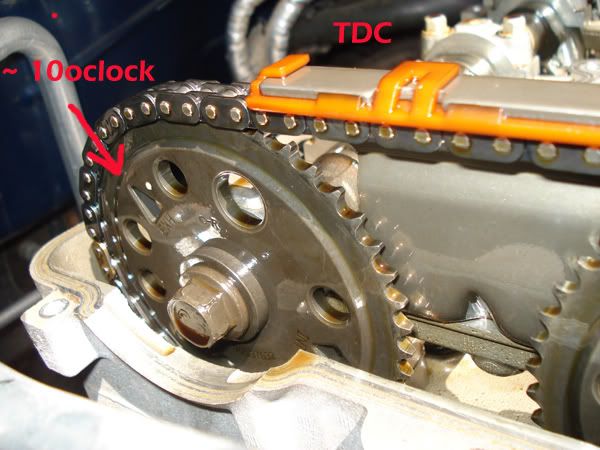
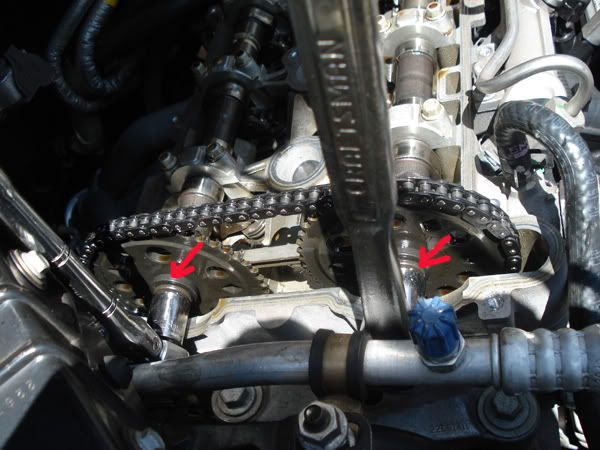
Now set the engine to TDC compression, spin the crank by using the bolt that hold the pulley on. Since the spark plugs are out you can use a long screw driver or something like it to stick in the #1 spark plug hole, DO NOT USE SOMETHING THAT CAN FIT ALL THE WAY IN THE CYLINDER!!! now with he screw driver in the spark plug hole slowly turn over the engine until the screw driver is at its highest point, since its resting on the piston top the piston will push it up. When the screw driver is at its highest point look at the marks on the cam gears. The Triangle shape on the exhaust cam should be aimed somewhere close to 10 o'clock position and the diamond on the intake should be facing close to the 2 o'clock position. If the piston is up and the marks aren't near there rotate the crank 1 full turn and then the marks should be were they are supposed to. They do not need to be 100% exact, just close.


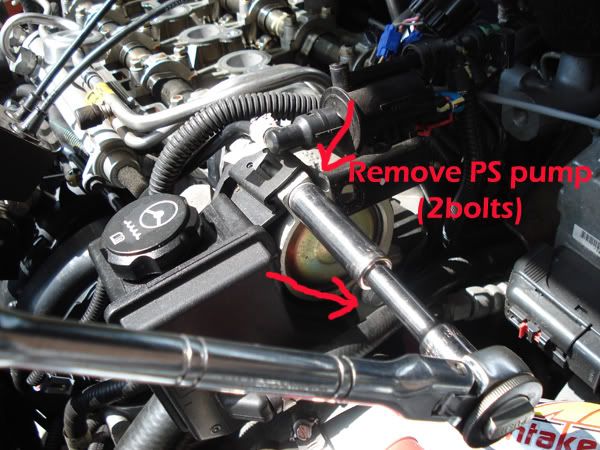
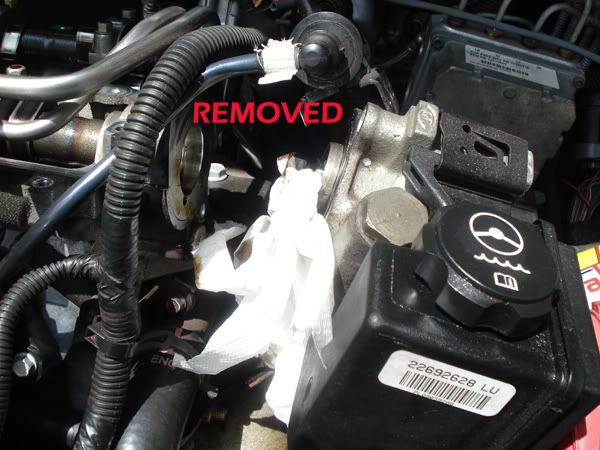
The next step from here is to remove the power steering pump which locks into the intake cam, there are 2 bolts for it pull them out and just push the pump aside.


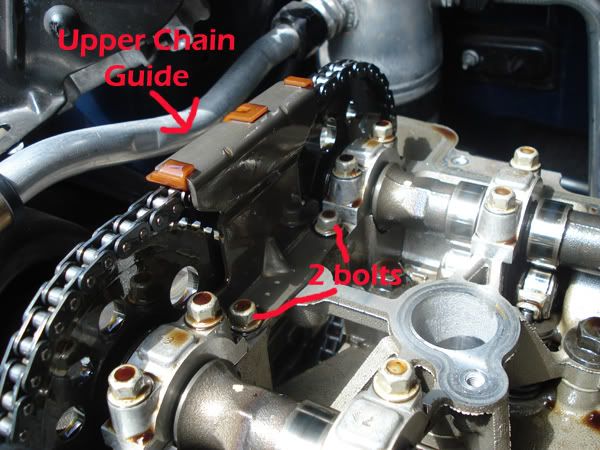
Then remove the upper chain guide in between the cam gears.


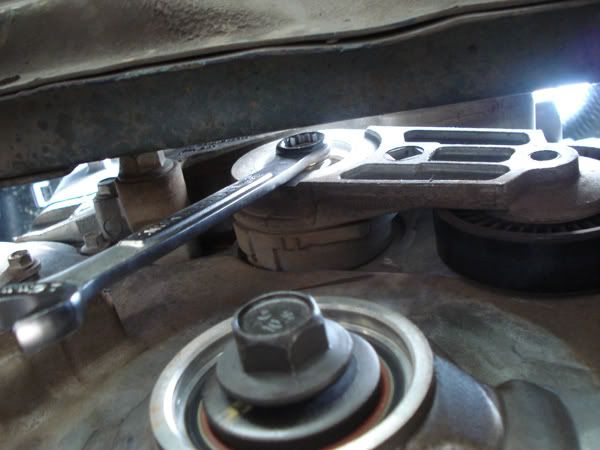
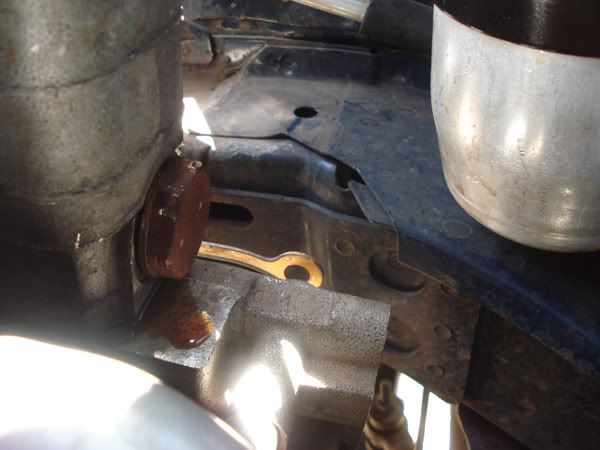
Now from underneath the car again. Remove the belt tensioner, its a pain in the ass, you need to use a wrench because you can't fit a ratchet, take out the 1 bolt thats on the tensioner and it will fall right off. There is a dowel pin the tensioner drops into when you have it sitting there right so you can't reinstall it wrong.


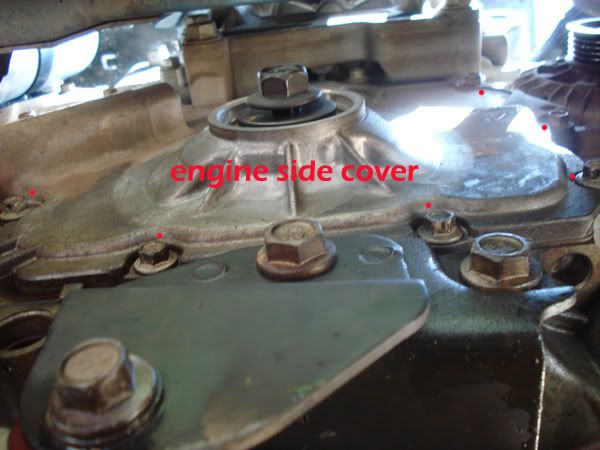
The next step is to remove the engine side cover, its a bunch of 10 MM bolts, they go around the outside of the cover and there is one that isn't on the outside edge, its towards the top left (firewall side) The little small cover on the cover with 4 bolts holding it on by the top left , leave it alone.


There is a chain tensioner bolt for the balance shaft chain thats on the left, its a 10 MM hex head, remove that too,


once those are out, pry up on and edge of it, its not gonna come off without a fight but be careful of the gasket, once it pops off make sure you do no try to remove the gasket, the gasket goes up under the upper motor mount so it wont come off, leave the gasket on the block. Put the crank pulley bolt NOT the pulley itself just the bolt back in the crank.

Once you are to this step go back up top and loosen up but don't remove the cam gear bolts on both cams.


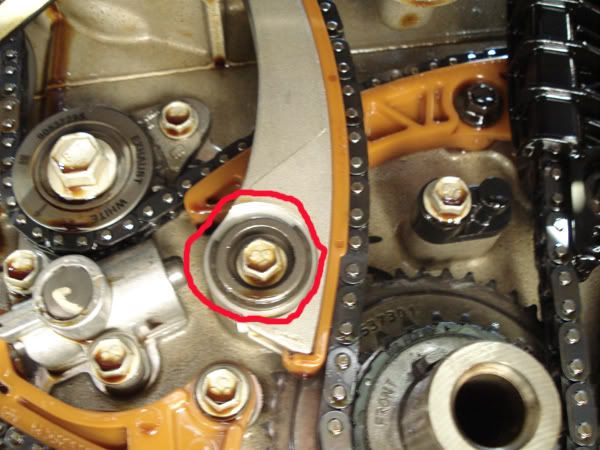
Now pull the timing chain tensioner bolt completely out. Its located on the passenger firewall side of the engine, its a big 1 1/4 inch bolt, remove it completely but be careful and do not drop it, you don't want it to come apart.
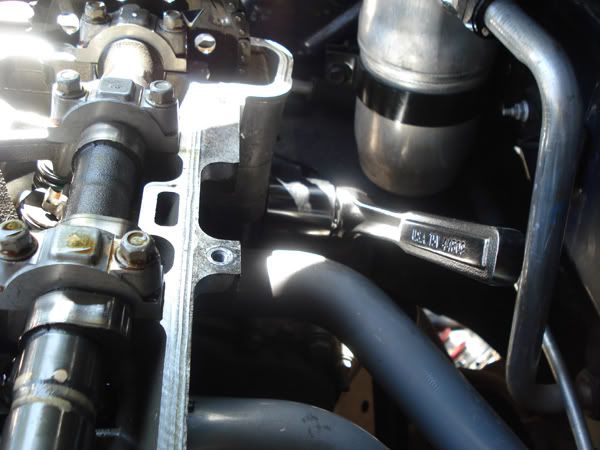

(Ready to unscrew)

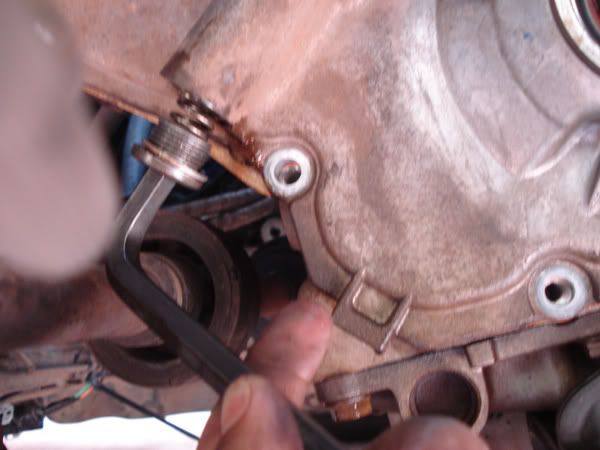
Go back under and find the chain tensioner itself, upper left from the crank, its the one that runs up the side of the engine, its long and is only actually attached with one bolt. Remove that one bolt that it pivots on, and push the tensioner out of the way away from the chain. There should be quite a bit of slack in the chain now.


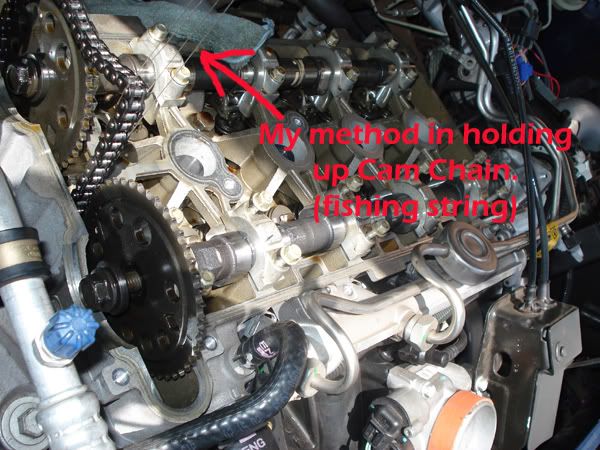
Now go up top again and use something to hold the chain up, just so it doesn't fall all the way through to the bottom when you remove a cam gear, bungee the chain to the hood, slide a ruler or something under the chain in between the chain and area where the valve cover sits.


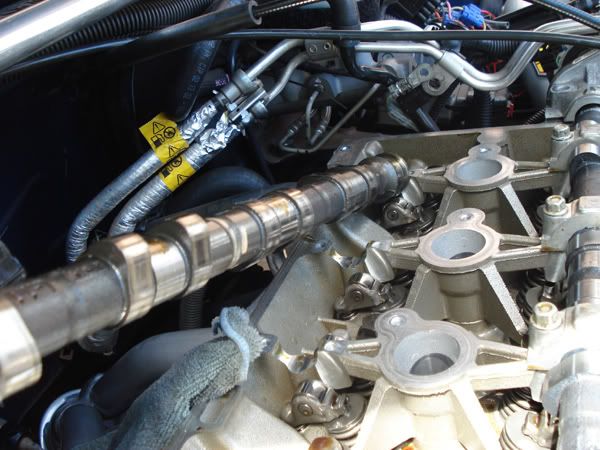
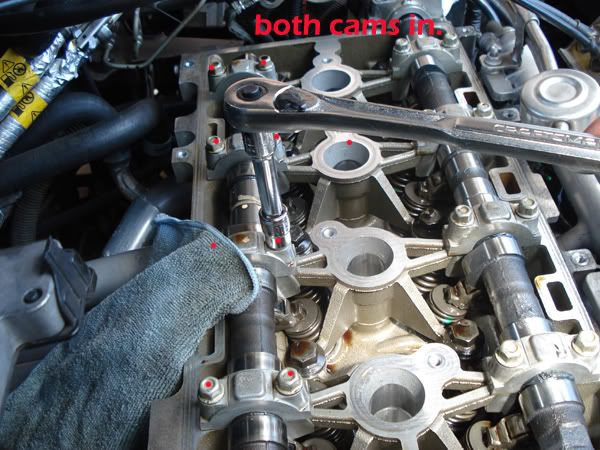
Take a look and note where the lobes on the cams are facing for the #1 cylinder. Now start with one cam, you can remove the bearing caps, do these little by little, like 1/2 a turn on each bolt, then go back around and another half a turn on each bolt again until you can un thread them by hand. The one by the power steering pump will need to be tapped lose to same way as the valve cover. KEEP ALL CAPS IN THE SAME POSITION FACING THE SAME DIRECTION, they need to go on EXACTLY how they came off keep all the caps and bolts in EXACT order and replace in EXACT same position. The caps are numbered and have arrows on them so its not rocket science. Once you get the caps off remove the cam gear, its should only be hand tight at this time. you can let the chain hang but not let it fall in. Now remove the cam itself, you might have to tap it upwards for it to pop loose, be sure when you put the new cam in, to prelube the bearing surfaces of the caps and the head.


Lay the the cam in so it is close having the lobes line up with where the stock cams lobes were, once the cam is in position torque them down in 3 steps ending with 89 in/lbs READ THAT CORRECTLY INCH POUNDS NOT FOOT POUNDS. The cap at the end of the intake cam by the power steering pump is 19 ft/lbs. Once the cam is on and tightened to spec put the cam gear back on, there is an off-centered key-way so it only fits on one way and do the other cam. When your done the chain will not be attached to anything up top at this point, just being held from falling using whatever method you rigged up earlier.

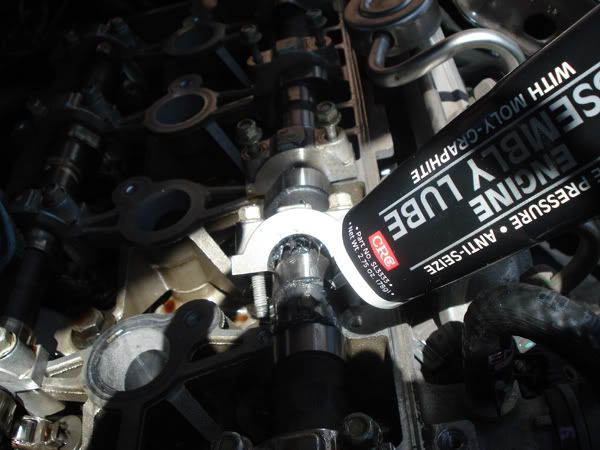
installing cam with lube.


Now look at the chain itself, there will be 3 colored links, from what I've heard the color is different from year to year but there are 3 colored links. You need to line up the 3 colored links with the marks on the cams and crank and since the chain is loose you can freely rotate it to the position to make the markings like up. There will be a white dot on one of the teeth on the crank, one link to that tooth,(Photo cred: skunk)

(Yellow dots represent the white paint dot on the teeth). (My ecotec also had a bigger dot on above the tooth and had no color links, the 3 links were silver instead of black) maybe because its was an 02 ecotec model.

one colored link to the triangle on the exhaust cam and the 3rd colored link to the diamond on the intake cam. You will most likely have to rotate one or both of the cams to get the marks to line up. Once all three colored links are lined up with the 3 timing marks turn the crank just a little bit to get all of the slack from the chain to the tensioner side of the engine. Reinstall the 10MM that holds the bottom of the tensioner chain guide then put the top tensioner bolt back in the big 1 1/4 inch one. Make sure all the marks still line up right, then spin the engine over by hand a few times to make sure nothing is hitting. If nothing is hitting then your done.

(Picture i found online, You get the idea)

Reinstall everything you took up, I recommend putting the top back together first just in case you drop something down in the side cover it will still be off. The valve cover and IDI cover also get torqued to 89 in/lbs again INCH POUNDS. Remember to put the upper chain guide back on and the ground strap that goes to the cam cover stud. Then reinstall the bottom last in reverse order of disassembly. Once everything is back together reconnect the battery and start it up. <br>

Comp cam vs stock


Re: FAQ: Ecotec cam install and cam timing
Tuesday, February 15, 2011 5:01 AM
Nice man! I appreciate the work into documenting everything so clearly!


Re: FAQ: Ecotec cam install and cam timing
Tuesday, February 15, 2011 7:24 AM
Very good visual aid really glad I have the cam tool though


Re: FAQ: Ecotec cam install and cam timing
Tuesday, February 15, 2011 8:28 AM
very nicely done


RIP JESSE GERARD.....Youll always be in my thoughts and prayers...


Re: FAQ: Ecotec cam install and cam timing
Tuesday, February 15, 2011 12:13 PM
Your pics go perfect with my write up, nice job, thanks for combining them together.


Re: FAQ: Ecotec cam install and cam timing
Thursday, February 02, 2012 12:53 PM
I am trying to replace my wife's 2004 Cavalier Timing Chain . Got the kit, changed everything,just like you show above, but when I try
to spin over the engine using the Crankshaft Bolt and Rachet & Socket, The Chain drops a little at the top right between the Cams,
then snaps back against the top guide, and it's out a tooth or two and keeps getting worse if you keep turning the Crank. I've done
over a hundred old cars and this never happened. TDC timing and marks were done exactly. What is going on?
Please answer if any body knows. I'm dadtim and i'm new on here.

Thank you in advance.
Re: FAQ: Ecotec cam install and cam timing
Thursday, February 02, 2012 1:10 PM
the chain will only line up to the color link once out of every like 16 or 32 revolutions of the crank. the chain snapping on top is normal. if you have the tensioner in right and all that, then everything should be ok once it fills with oil and all that.


Forum Post / Reply
You must log in before you can post or reply to messages.


Start New Topic Advanced Search