V6 swap info for 3rd Gens - Third Generation Forum

Forum Post / Reply
You must log in before you can post or reply to messages.
V6 swap info for 3rd Gens
Tuesday, September 11, 2007 4:18 PM
V6 Swap for 3rd Gen J-bodies:

Here is a semi how-to that I have put together to help any who are interested in doing this swap. I’ve organized it in the order that it is best to consider options, since some things remain options for well into the swap. For the most part, there are many options when doing a 60 degree (3100, 3400, 3500) swap, but with the 3800, just about everything has to be custom.
The exhaust on any of these swaps requires a custom downpipe to the cat, but other than that, the only reason for other fabrication would be to add a turbo, or if you are upgrading your exhaust at the same time.

The five basic components to consider are:

Transmission
Mounting options
Accessory mounting, and AC compressor/plumbing
ECM/wiring
Various plumbing & hoses


Transmission:
The GM FWD V6 engines share the same bolt pattern as the OHV 4 cylinder engines ( the two found in the 3rd gen J-body cars are the 2.2OHV and the 2200)

If you have a car equipped with an OHV engine already, you can retain your existing tranny. If you are swapping to a car with a DOHC engine, you need to swap your tranny as well.

Options for auto are the 4t40e (4 speed auto) that comes in the J, the 4t45e that comes in most of the FWD V6 cars, and the 3t40e, if you feel so inclined, but this will cause a difficulty with the ECM as well.

Options for manual are the Isuzu from an 95-99 OHV car, the Getrag from an 00+ OHV car, or the NVG T550. The Isuzu and the Getrag will bolt into the factory mounts if you are swapping from a DOHC of the same genre of car (95-99 or 00+). The NVG most likely needs new mounts.

If you wish to convert from an Isuzu to a Getrag, search for that swap in the transmission forum.


Mounting options:
Here there are many ways of doing it, but the two most basic options for a 60 degree V6 are the upper mount from a 99+ N-body 3400, and the upper mount from a 94-98 N-body 3100. For the 90 degree (3800) engines, you need a lot of fabricating. There is no bolt in mount that works for these engines. Almost everyone who has done the 3800 swap has built a subframe with the mounts on it. This is a good idea because of the increased torque the motor will have anyway.

Entire 99+ N-body mount:


This is a pretty straight forward option, but it requires the removal of the entire frame rail portion of the J-body upper mount (removing studs and grinding some welds), and the mounting of two bolts into the frame rail. This can be done by making a plate with the bolts already attached to it, and plug welding it to the frame rail.

94-98 N-body mount:

This is probably the most straight forward option, but has one minor hurdle to get over, which is the fact that if you bolt it in exactly as it sits, the passenger side of the engine will be 1” lower than it should be to sit level. Overcoming this can be done in three ways. You can remove the frame rail portion, and weld or bolt a spacer under it, shave the Y bracket on the front of the engine by 1”, or you can make an offset T bracket. I chose the last option, because it still remains the most bolt-in method.


It is not the cheapest however, as a custom aluminum machined bracket can be expensive if you have to pay someone for it.

99+ N-body mount with factory J-body frame rail bracket:

You can leave the factory frame rail portion of the upper mount as it is, and use the 99+ N-body mount by making a custom piece that bolts between the two mounting points. If you have access to a metal shop, this may be the most cost-effective route. However, if you have to pay for the mount, it can be expensive as well.

Lower dogbone mount:
There are three options here:
modify the factory N-body style (the unmodified bracket lines up 1 ¼” too far outside the dogbone),


modify a lower mount from a W-body (this is a small plate that bolts to the subframe on these cars through a rubber bushing.),
or make a custom mount, as many have done.


Accessory brackets and AC:

There are two accessory setups on the 3100, 3400, and 3500 (non-VVT) engines.


The 3100 setup (left) has the tensioning pulley mounted just above and to the rear (right) side of the crank pulley, and no idler pulley.
This setup is necessary if you are going to use the 94-98 N-body mount, because the Y bracket that bolts to the front of the engine fits around this setup, but will not fit the 3400/3500 setup.

The 3400/3500 setup (right) has an idler pulley just above the crank pulley, an idler pulley below and between the alternator and power steering pump, and a tensioning pulley below the alternator. This setup is necessary if you are using the 99+ N-body mount, because the mounting block on this setup is on the timing cover right in the way of the 3100 tensioning pulley.

AC compressor options are as follows:

The compressor from the 99+ 3100/3400 will work using the plumbing from the 99+ N-body. This means the tubing from the compressor to the evaporator, and from the condenser to the compressor.

A Buick Park Ave compressor can be used that will retain the J-body plumbing because the in/out fittings attach at the rear of the compressor as the J-body factory unit does.


ECM/wiring:
This is perhaps where the most options and obstacles happen. There are many different sets of electronics available for the 60 degree engines. This is due to the fact that the 60 degree design has been used in the majority of GM’s FWD vehicles for the past 20 years, as well as a good amount of RWD vehicles.

The electronics from the ODB II 3x00 FWD engines (96 and later) can be used, but in most cases require a delete of the Passlock II (anti theft) system. Also, for gauges to properly work, you may need to swap the BCM from the same vehicle.

Electronics from a 2nd gen 3.1 are also an option, but for the gauges to properly work, it is necessary to piggyback the factory 3rd gen computer and split some of the sensor feeds.

You can also use the electronics from a 3rd or 4th Gen F-body car with the 3.1 or 3.4 engine. If you chose the 3.4, you will have to add a second O2 sensor for the front bank of cylinders. Also, you will have to get a VATS (anti theft) bypass module, which is cheap and easy to wire into the harness. One major drawback of using the RWD electronics is that the wiring harness must be completely redone, because the sensors, and accessories are in completely different places between a RWD and FWD engine. (for example, the throttle and all related sensors/controls are at the opposite end of the block).

Benefits of using the F-body or 2nd Gen J-body electronics are that they are available already set up for a manual transmission.

If you are using ODB II electronics and a manual transmission, you must modify the wiring harness to remove some of the automatic transmission plugs, and have the automatic transmission codes deleted from the ECM.

One drawback to using the 94-95 F-body electronics is that they are not compatible with tuning software. They use an odd hybrid ODB 1.5 system, which there is really no aftermarket support for.

The other options for electronics, which require a lot more setup time, and in some cases, a lot more cash, is to go with a standalone system.

Megasquirt has been used with some decent success, as well as the Electromotive TEC 3. The Megasquirt is far more affordable for most, and is also a simpler system to install. The TEC 3 is quite costly, and requires some fabrication to function, as well as a lot of work to install and set up.


The final component is the tubing and hoses. Here is what I have matched up to work pretty easily:

Upper and lower radiator hoses from a 94+ N-body (there are 2 options for the lower, which you can match up to whatever you already have. The options are split hose or single hose)
Heater hoses from a 99+ N-body (this also requires the engine pipe to the heater hose from the 3400 in place of the one that comes on the 3100)

Power steering lines: for the high pressure side, the N-body lines work fine. For the low pressure side, some fabrication is necessary with part of the N-body and part of the J-body lines.

Fuel lines: the lines from the Eco will work well, as they have the same click-on connections as the newer 3x00 engines. You can also custom make lines that match up to the older style lines on the J-body. This will require flaring and bending tools.

Air intake can be used from the N-body cars, and can be matched up to the J-body air box. You can also use an aftermarket WAI or CAI from an N-body car if you want to remove the factory air box.

Vacuum lines can be used from the N-body, including the brake booster hose.


This gives a pretty good idea what's involved for anyone interested in attempting this swap. There are aspects of doing this swap that vary depending on which route you choose to go, and you will no doubt run into something that others haven’t, so you will have to be resourceful and figure out what works. Since these engines were never available in these cars, there is no one answer. I have tried to cover all of the major aspects, but it would take pages upon pages to attempt to address every little concern. As any new things are discovered, they can be added. If anyone has another way of doing something, feel free to add it.

I ask that everyone please keep the discussions of possibilities, feasibilities, and “is it worth it”, etc. out of this post. This is meant to be clean resource. We have started many progress threads and discussion threads that run into so many pages that the same questions get asked over and over again, and the post becomes so long that no one has time to sit and read it all, let alone make much sense of it. Let’s keep this one clean.


I must give credit for some of this information and some of the picutres to the following members: Mr. Goodwrench, SHOoff, RSF98, Carl Tremblay, John Beers, Joe Malachowski, and Kardain.

If I left anyone out that has performed this swap and contributed to the multiple threads, my apologies. PM me and I’ll edit.
Also, I'm sure that I've made a mistake or two on here, so I will edit as corrections come up. PM me if you notice something I made an error in or left out.


Re: V6 swap info for 3rd Gens
Wednesday, September 12, 2007 4:39 AM
VERY good info man, well done, couple things I noticed. Not just making this up aswell (I performed RSF98's swap )
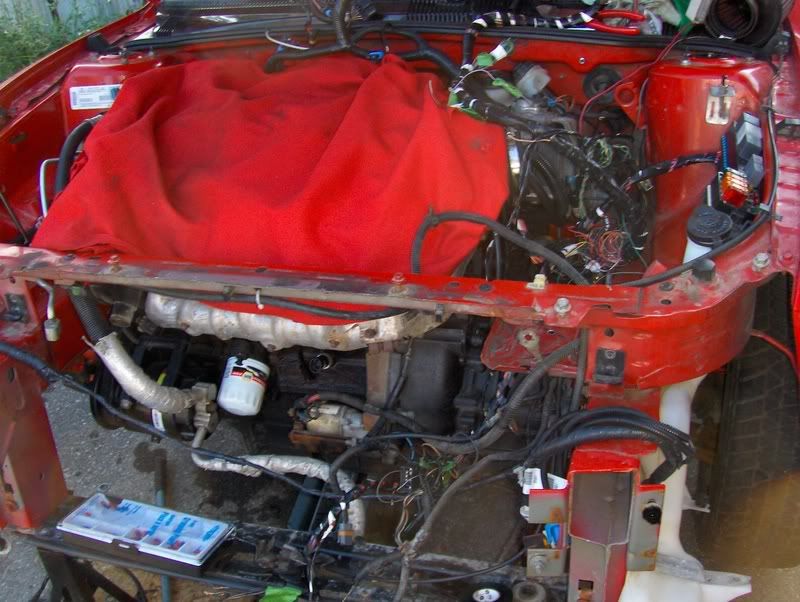
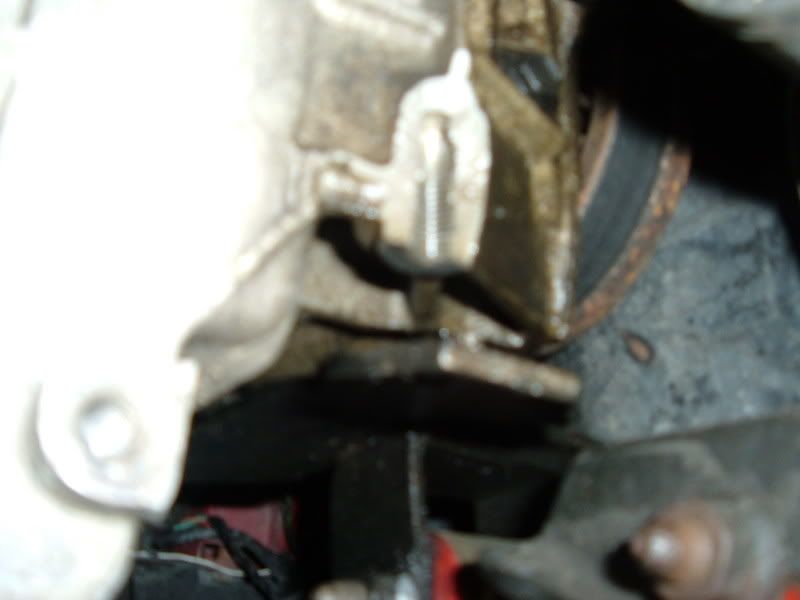
For the AC compressor, if you want to keep the factory AC lines, the compressor to use is from a 95 3100 Buick Skylark. You will also need the little bracket that goes between the engine and compressor from a 94-96 Grand Am for this to work. Here is a picture where you can kind of see this compressor mounted. With this setup I also use a 95 3100 Grand Am belt.

If you are going to use the 94-96 N-body top mount and shave down the engine bracket, you will only need to trim it about 3/4 inch, thats what I did and it ended up perfect.
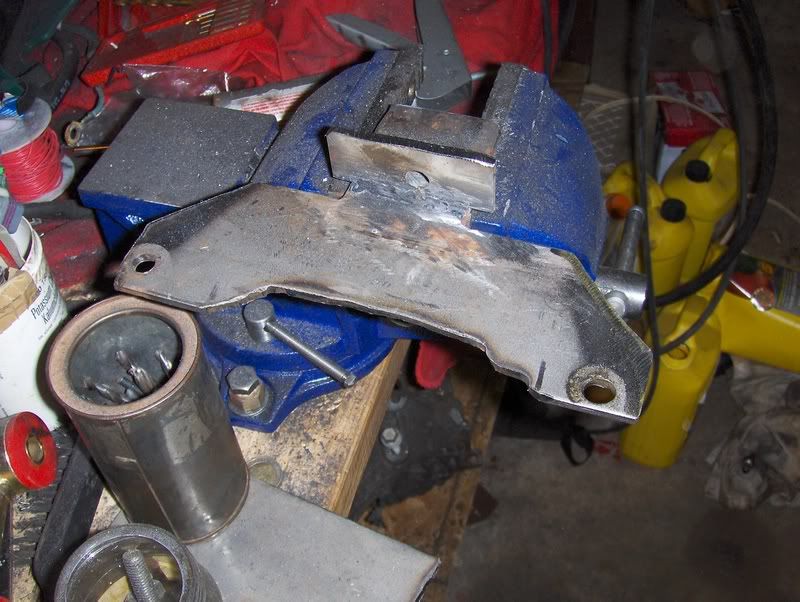
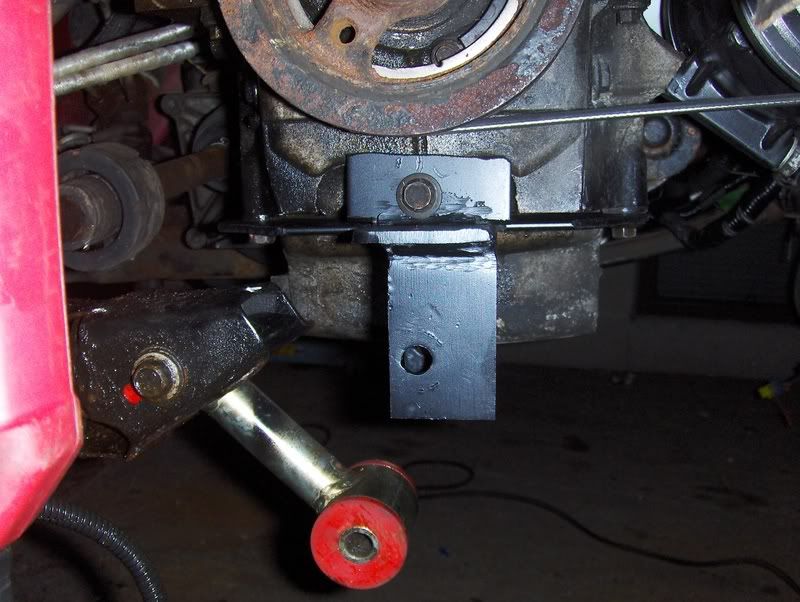
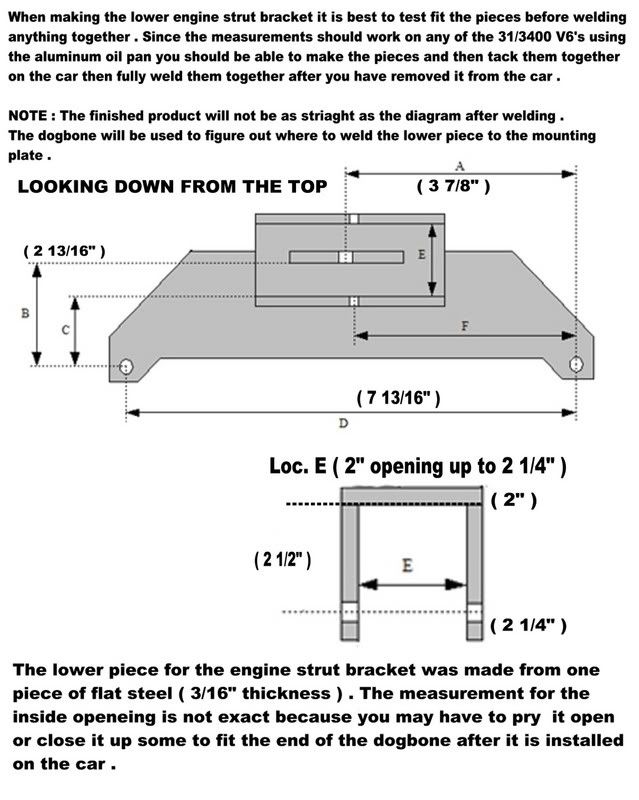
I though I would put up a pic of the custom lower mount bracket that I made aswell, so you have a general idea of what to do if you tackle making one yourself.


In terms of wiring, I spliced a 2003 Alero wiring with the 98 Sunfire harness. I used the 3400 pcm to run the engine and used HP Tuners to get rid of VATS and all the auto codes and used the J-body PCM to run the gauges. This setup worked pretty well, so this is another option for wiring aswell.


Re: V6 swap info for 3rd Gens
Thursday, September 13, 2007 9:37 PM
GREAT STICKY Thanks for taking the time to do this
All the major issues on one page !!!!!!!!!!!!!!!!!!!!!!!!!!


Re: V6 swap info for 3rd Gens
Friday, September 14, 2007 11:43 PM
I know that there are some differences between the 3100 and the 3400, so here's a couple things that I did:

Quote:

Fuel lines: the lines from the Eco will work well, as they have the same click-on connections as the newer 3x00 engines. You can also custom make lines that match up to the older style lines on the J-body. This will require flaring and bending tools.


My 97 Fire had the clip on connectors that mated to the 3400 with ease (in case one needs to source parts)

Quote:

Heater hoses from a 99+ N-body (this also requires the engine pipe to the heater hose from the 3400 in place of the one that comes on the 3100)


I trimmed back the J hoses a couple inches and used some worm gear clamps to hold them in place. I'll get pics when its daytime

The 3400 can be switched over to the 3100 setup, it will require however, the removal of at least 1 pulley boss for clearance for the Y bracket as well as the tensioner bolt from the 3100.

Since this is a compilation of info, one more tidbit of info:

The starter from the 2200/2.2 OHV will bolt to the 3400, so if one gets an engine from a yard w/ no starter...


Re: V6 swap info for 3rd Gens
Saturday, September 15, 2007 5:54 AM
Hey guys, thanks for the added/corrected info. I knew I would forget something and make a mistake.

gtpsunfire, sorry about the mixup. I had you and RSF98 backwards. I was thinking it was your car. Nice pictures.

John Beers, thanks. That's exactly why I took the time, and asked Dave to sticky it. Just out of curiosity, I searched all threads for things like 3400 and V6, and I came up with something like 50 posts asking if you could do it, or has anyone thought of it, etc., so we really needed it here.

Kardain, thanks on the starter. Funny how I forgot such a basic thing.
Also, interesting on the fuel lines. I didn't know GM had put those on any of the J's before '00

One thing I also wanted to clarify, as I was just looking over it again, is the heater pipe that you need to swap if using a 3100. The one I'm refering to is the one that wraps around the front of the engine and bolts into the top of the water pump. The 3100 one sticks up by the brake master cylinder instead of exiting more rearward as the 3400 one does.


Re: V6 swap info for 3rd Gens
Saturday, September 15, 2007 4:04 PM
Actualy, for the heater lines. The 3400 montana lines go up towards the brake master aswell. The Grand am lines wrap around the back of the engine.


Re: V6 swap info for 3rd Gens
Tuesday, September 25, 2007 2:30 AM
Can anyone give me a little more detailed instructions on the install for a 99 cavalier with 2.2 to a 3400. I was wondering about the dimensions for the engine mounts and about the wiring, do I need to swap the computer from the 3400 , and can I use my cluster?
Re: V6 swap info for 3rd Gens
Tuesday, September 25, 2007 10:56 AM
Lower engine mount: Please read through the 3rd Gen V6 swap threat (i know it's huge) but you'll find information in there about use of what computers we have used for the swaps.


Re: V6 swap info for 3rd Gens
Tuesday, September 25, 2007 11:41 PM
claseisgod clase wrote:Can anyone give me a little more detailed instructions on the install for a 99 cavalier with 2.2 to a 3400. I was wondering about the dimensions for the engine mounts and about the wiring, do I need to swap the computer from the 3400 , and can I use my cluster?


you will need some sort of computer swap. the 2.2 ECU won't run the 3400.

I'm using a stock 3400 PCM w/ an initial custom tune by Milzy Motorsports to remove the auto trans stuff, then will be going through further tuning by me. RSF98 is using a stock 3400 PCM self-tuned for the same function (03 Alero). SHOoff is using Megasquirt, Quiklilcav is using a Camaro PCM.... the second gen guys use a rechipped 3.1l PCM, others have used a 1998 3.1 PCM (apparently an easier way to bypass the theft lock and for OBD2 compliance)

Depending on what your computer source will depend on the harness source (however if getting a 2000+ 3400, you have to get a 2000+ harness due to changes in the injectors) which will then depend on the wiring, or swap in the 99 injectors AND injector harness if using a 1999 3400 engine harness.

Given that there are that many options to run the engine, there are the same number (if not more) of ways to wire it in.

Now the gauges are another story. 2 options... custom dash or piggyback your 2.2 computer to drive the gauges.

Sorry it isn't a straight forward answer, that's the best I can summarize the 30-something page thread.

Mechanically, its the same as the first post.


Re: V6 swap info for 3rd Gens
Monday, October 01, 2007 11:09 PM
Re: V6 swap info for 3rd Gens
Monday, October 15, 2007 9:31 AM
u mentioned about the delete again, what makes it possibile to delete, something i can buy? or somewhere i can go

Re: V6 swap info for 3rd Gens
Monday, October 15, 2007 9:32 AM
the auto and theft
Re: V6 swap info for 3rd Gens
Monday, October 15, 2007 12:16 PM
www.hptuners.com


Re: V6 swap info for 3rd Gens
Monday, October 15, 2007 1:50 PM
the standard VCM suite is what i need? 500$
Re: V6 swap info for 3rd Gens
Monday, October 15, 2007 5:06 PM
yep standard will work. pro if you want no-laptop logging among other features


Re: V6 swap info for 3rd Gens
Wednesday, October 17, 2007 2:38 AM
May I ask from a moderator, since this is a sticky that it be locked. And from that point on only be added to if someone has information, pictures, diagrams, and such to add to it. That way we don't turn this into another 40 page discussion.
thx


Re: V6 swap info for 3rd Gens
Tuesday, October 23, 2007 9:32 AM
a good idea is to put some light strength thread locker on the lower mount plate bolts to keep them from vibrating out like my front one did, leaving too much stress on the back bolt. and breaking the oil pan


posted this in the other thread but figured the info thread would be a better place for it


My 3400 Swap Page
Re: V6 swap info for 3rd Gens
Monday, November 12, 2007 10:15 PM
I would like to add my 2 lincolns.

My swap was a 2001 cav 2.2 auto, with a 2001 3.4 grand am gt auto.

TRANSMISSIONThis grand am transmission Is a direct drop in and drive, cav axles pop right in. I believe only 00 and 01 gam gt's will work in this application.

STEERING
If the 2001 Grand am steering rack is swapped the n body ps lines are direct bolt ins. The rack is direct bolt with the exception of the outer tie rod ends. Same ratio and lines are exact fit. This is if the rack is an available option for you in the budget. I dont know how many years the rack covers.
It is not necessary to hook up the power assist solonoid on the Power steering pump. Just make sure if you have this style pump that you order lines for variable assist. they are different. You cannot use this feature because it goes through the ABS system of the N body and has a sensor on the base of the column which the J doesnt have.


SERIAL DATA?
On 00+ to 00+ swaps you can connect the serial data lines (purple wire) from the 3.4 Pcm to the J body serial data. this will allow the function of the cluster minus the fuel gauge.
DO NOT piggy back the 00+ pcms by using the serial data lines. ie. use the n body pcm for the engine and use the j body pcm for the fuel gauge... This will cause hundreds of miles to be put on your odometer when the ignition is cycled on and off.

00+ cluster fuel gauge will not work with the 00+ N body PCM. An aftermarket a pillar gauge can be purchased through Dakota digital at www.summitracing.com

A/C
I used the N body 3.4 a/c compressor, and the cav plumbing, the line had to be gently bent to fit but works great.
If using this line combo, and n body dual fans, be sure to grind out some of the fan shroutd to allow access to the a/c charging port later. As said above, that the n body lines will work, I think that one was missed. My research shows that they wont work. the ends of the lines are different, and are different lengths since the n body dryer is behind the bumper on that side.

BATTERY AND AIR BOX FITMENT
If the battery tray is cut loose and turned sideways there is enough room to install the n body air cleaner and fuse panel/ junction box.

EXHAUST
on the exhaust , use the grand am down pipe(with cat), the cav 02 sensor will work in there if needed, take the rear bolt flange and grind the alignment lip off of the gasket surface. replace the gasket and bolt the cav flange to the grand am down pipe. exhaust done.

Every ones swap will be unique. especially when it comes to the wiring. To help with trouble shooting wiring issues. always solder and heat shrink splices and document any moved wires especially power feeds and grounds. If possible remove the junction ground blocks that are on at least the 2000 and newer ones. use a couple of ring terminals and solder them on. Pay close attention to the one under the battery because this is the first one to go.


01 cav w/01 3400 gam gt 4t45e

Re: V6 swap info for 3rd Gens
Tuesday, November 13, 2007 5:03 PM
The gauge that I used for the fuel guage is this one from Dakota digital. It is programmable for your sending unit, What that consists of is cutting 1 of 3 wire loops to get the correct resistance. Your reading is from 0 to 99, or can ge changed from 99 to zero. Percentage of fuel or the other way is percentage of air in it. It is a fery nice guage, Its reading is pretty steady, unike The Nordskog brand which bounces around and is very slow to respond. Oh and that brand doesnt currently work correctly for us any way unless you send it to the manufacturer and pay more $. I tried it.. Any way the dakota also has a blinking feature that you can change up or down. when it gets , lets say 10% it will blink 10 at you. And it does have a dimming feature for night time.
Im very satisfied with this Item!
Its been a while but I believe the sender Ohm reading is 50 and 250, E - F which I believe its the 40 and 250 when programming.

http://store.summitracing.com/partdetail.asp?autofilter=1&part=DAK%2DSLX%2D06%2D1%2DK&N=700+400580+4294925227+115&autoview=sku

Here is the Oil Psi gauge that Im also running. Very nice but you have to buy a sender and install a T on the block to run the engines sender also.
http://store.summitracing.com/partdetail.asp?autofilter=1&part=DAK%2DSLX%2D03%2D1%2DK&N=700+400580+4294925227+115&autoview=sku

Sender depending on the thread size you choose
http://store.summitracing.com/egnsearch.asp?Ntt=oil+gauge&N=700+400580+115+4294839076&NeXID=5&Ntk=KeywordSearch

Here is the a pillar pod that I used, fits nice and almost blends in perfectly with the charcoal.
http://store.summitracing.com/partdetail.asp?autofilter=1&part=ATM%2D10204&N=700+115&autoview=sku
they have a single also
http://store.summitracing.com/partdetail.asp?autofilter=1&part=ATM%2D10205&N=700+115&autoview=sku


01 cav w/01 3400 gam gt 4t45e

Re: V6 swap info for 3rd Gens
Tuesday, November 13, 2007 6:02 PM
I knew Id forgot something.

The listed 50-250 ohm reading is for J's that have the tank sender originally going to the PCM. 00+, maybe 99's.
Not sure on ohm of pre 99's that the sender goes directly to the cluster. they may be the old 0-90 ohm gm senders. However this gauge Is A universal and will work with either senders.

If in doubt just pull your sender out and measure the resistance empty and full with an Ohm meter.


01 cav w/01 3400 gam gt 4t45e

Re: V6 swap info for 3rd Gens
Tuesday, November 13, 2007 7:16 PM
^^ I know my 97 is 0-90


Re: V6 swap info for 3rd Gens
Tuesday, November 13, 2007 7:32 PM
Part # for the N-bod throttle cable:

22619740

I needed to get one, can't say for anyone else...


Re: V6 swap info for 3rd Gens
Tuesday, November 13, 2007 7:52 PM
If your using the N body throttle cable you may have to bend the pedal a little because the N cable seems to be just a tad bit shorter. It will work fine though. thats what I used. it will raise the pedal off of the floor if you dont bend it down.

I think there are a couple of different throttle body brackets on 34's so dont be suprised if the n body cable doesnt work.
Some attach with a ball on the end of the cable and others have a barrel, come cable ends are round, some slide from the front.
Mine was a slide in, I bought the cable for the 01 grand am that the engine came from.
I would recommend buying the cable that is for the engine your swapping in, or at least the Throttle body and bracket your using.


01 cav w/01 3400 gam gt 4t45e

Re: V6 swap info for 3rd Gens
Wednesday, November 14, 2007 7:30 PM
I actually just trimmed part of the plastic end to it, and it fits perfectly. No need to mod the pedal. Also, I know someone here has used the 2nd gen 3.1 cable with no problems.


Re: V6 swap info for 3rd Gens
Monday, November 19, 2007 5:09 AM
Okay, probably a stupid question...but what's the diff' between:

3.1 Euro engine and 3400?

Yes, I'm that completely mechanically-retarded.


Is $250 for running 3.1/3400 a good price?
Forum Post / Reply
You must log in before you can post or reply to messages.


Start New Topic Advanced Search