So I finally got my hands on a set of projectors and an HID kit.
The projectors are the no-cut kits from Retro-Solutions which I got from John in the GP.
The lights are the ones off ebay with the black housing.
This is my first project to build anything.
I know I did a terrible job on the sealing with silicone.
However, I am satisfyed with it and love the way they look.
The white ring lights blue when plugged up.
Let me know what you think.
If I can ever figure out how to post larger pics I would. Can someone help me on this?
This is the final product:


so tiny but for the most part look nice lol

Looks good from far... I can't tell if it's far from good yet.
Edited 1 time(s). Last edited Monday, May 04, 2009 5:56 PM

FOR SALE
looking good.
how bour some installed shots....and bigger pictures.
email me some of your pics, and ill get them blown up for you.
Edited 1 time(s). Last edited Monday, May 04, 2009 6:12 PM

So far I only have one done and I'm gonna start on the other one tomorrow but I'll put it on and take some pictures.
John, I'll email you those pictures so you can blow them up and post em for me.
lol small images. click on them and copy the direct link

Besides being kinda rough around the edges with the sealant, they'll look really good. I bet they look even better installed!
 * * BIG FOR SALE POST * *
those lights look good from what i can see just get the other pics blown up, good job man.

tha_prowler wrote:lol small images. click on them and copy the direct link
Besides being kinda rough around the edges with the sealant, they'll look really good. I bet they look even better installed!
I need some help making pictures big like this, lol.
Been trying to figure it out for the past half hour.
Step by step process?
Copy and paste the direct link from Photobucket, it's that simple lol

Nice work btw

Go to your photobucket (since it says that is where you have them hosted)
Go to the picture you want to post here. Underneath the picture, it has a few different addresses, with a small description of what they are for.
Find the one that says "direct link". copy that and paste it between the [\img] here.
BAM big picks. I would do it now, but photobucket is blocked @ work.
Aha!
Figured it out. Posted them bigger now.


I took it apart again because as I was doing the second one, I found a way to make it fit better. So now I'm just waiting on the paint to dry overnight and they will be complete tomorrow.
This is pretty much how I built them.
Used the oven and seperated the lens from the housing. Second time was easier. Pulled the cap that hangs down out and taped up the lens from it getting scratched.
Had to make these

fit into here

I cut a small grove with a small hacksaw so I can make the angel eye wire fit without having to drill a hole in the housing. Thought it would be easier this way.
Front:

Back:

Got some washers from O'reilly's and grinded the inside ring down so it would fit around the projector.


That's it so far.
I'm gonna finish them tomorrow, put them on take pics, and wire everything up.
how the F do you change the bulb on them?

Wojo wrote:how the F do you change the bulb on them?
take out the screw in the back of the projector, and they slide out.
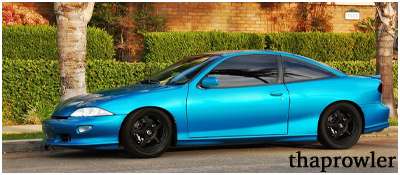
nice..... im feeling them lights now u just need to get the installed pic i cant wait to see

head lights look good on the car, i have the same gap between my heads light on the pass side and i have my factory headlights in place with the same bumper.
I'm not very familiar with the contruction of the pre 03 lights, but did you paint the reflector or remove it?
Lights look great by the way

Eternal (LuxuryTax) wrote:I'm not very familiar with the contruction of the pre 03 lights, but did you paint the reflector or remove it?
Lights look great by the way
The housing was black to begin with so I just painted right over the chrome reflector with the black paint. No sanding or anything. Stuck to it nicely.
first i see on the pass side the reason why the corner has a huge gap is for the fact that it seems you dont have the tab in the corner inserted into the hole there i see on the fender must go there to get that gap fixed. if its broken gotta make a new tab.

those look pretty fuggin nice in there. they go with the car really well.
just need to work on those sealant skillz.
SweetnessGT wrote:Wow... that sealant is a mess man. After going through all that work to do such a nice job mounting them you kinda half-assed the part that people actually see!!!
Other than that, nice job. How are you supposed to aim these projectors, though? Or are you supposed to just depend that the stock aiming screws will do the job?
An interesting detail that I did was tape off the inside of my lenses and paint the last 1/4" flat black, this way when the lenses went down onto the housings the sealant didn't show through. Then the outer sealant was a tiny bead for finish....
My #1 tip for you - use LESS sealant, creates less of a mess to clean up.
Is the fitment poor because of the lights, or the bumper?
-Chris-
THESE PROJECTORS ARE SET UP TO TAKE THE AIM OF THE LIGHTBULB, AND YOU ADJUST THE HEADLIGHT AS A NORMAL LIGHT. YOU JUST HAVE TO BE SURE YOUR CUTOFF IS STRAIGHT WHEN INSTALLING THEM.
i still want output picks from 25 feet away from a wall. nobody has been able to provide them. if the cutoff is good and the beam is wide. im sold on them.
Wojo wrote:i still want output picks from 25 feet away from a wall. nobody has been able to provide them. if the cutoff is good and the beam is wide. im sold on them.
ill see what I can do. I have a set at home i am installing for someone I could get a shot....so long as you dont mind them not being installed on the car, just in the headlight housing.


