Ok I am at the point where I have the gauge overlay on, but i have a few problems.
1. The overlay is moving, do I just glue it on or tape?
2. It came with a Power Inverter, On/Off switch. I can plug the power inverter into the gauge overlay, then the on/off switch to the power inverter, but what do I do then? How does the power get to the power inverter?
There is also a pos and neg wire on the power inverter. Where do they go?
you just answered you own question. + should be power for the power inverter, and - is the ground.

Save our Environment, Plant a bush back in texas.
Quote:
you just answered you own question. + should be power for the power inverter, and - is the ground.
I think he want to know where to get the power from.
Hook the pos wire up to your driving lights so they come on when you turn on your lights.


My apologies, i misread your question.

Save our Environment, Plant a bush back in texas.
[quote=Myles O\'Howe]Ok I am at the point where I have the gauge overlay on, but i have a few problems.
1. The overlay is moving, do I just glue it on or tape?
2. It came with a Power Inverter, On/Off switch. I can plug the power inverter into the gauge overlay, then the on/off switch to the power inverter, but what do I do then? How does the power get to the power inverter?
1. It stays in place when you snap the gauge cover ("glass") back on
2. I have mine ran to a fuse, using a fuse tap, my radar detector is on the same one so its switched. and its grounded on a nearby bolt that is near the fuse box.
just went out an checked it's tap'd into the cruise control fuse.

1. Went to Wal-mart and went to the scrapbooking section and they have this really thin double-sided tape for pictures. That is what i used to hold down my overlay and it worked great.
2. I hooked up my positive wire to the instrument light wire coming from my radio. And now my gauges can be turned on whenever i have on my parking lights\headlights and i can dim them also. and they also turn off with my headlights.
I have had them installed like this for over a year now with no issues.

I wrote this a few months ago when I did mine.
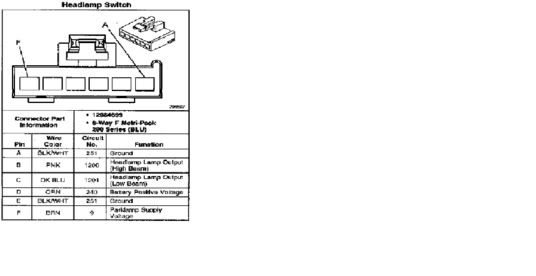
STLWACO wrote:STLWACO wrote:This is the only way I could get it. Alldata won't let you copy. So Did a screen print, croped the pic that I needed, and slaped it in photobucket. To see what it says, you may need to copy the pic and past to paint and enlarge it.

This is the harness you need to find. To find it, Get a 7mm socket and undo the three screws on the bottom of the steering column cover. Pull the cover off the column. On the top left, you will see the headlight/turn signal switch (aka multifunction switch). Look on the back of this switch. The first harnes you see should be the one if you are looking correctly. Unplug the harness. There are two harness on the switch so just to make sure you get the correct harness, count how many pins its has. It should have 6 pins. If so, splice into the brown wire on the harness and connect the red wire from the gauge kit to it. That is your 12v switched source. Now splice into the black wire on the harness and connect the black wire from the gauge kit to it. That is your power setup.
Now to put the gauge kit in the cluster. Remove the top dash pad following directions from other write ups on the JBO. Remove the instrument cluster/ radio/ hvac bezal following the directions found here on the JBO. Using the 7mm socket that you used to remove the steering column cover, undo the two screws that hold in the cluster. They are both visible from the comfort of the driver seat. Lift the cluster out. Unplug the harness from the back of the cluster by squeezing the tabs together. Now take the cluster inside the house with you. Find some scotch tape. Set the cluster on a flat surface. Undo the tabs that hold the clear plastic cover on. Once removed, move the needles to where they all point torwards the top of the cluster. Now start to slip the needles thru the holes of the gauge kit. Make sure the needle base (Black circle of the needle) go completly thru the holes and the gauge kit lays flat on the original gauge face. Do you remember the tape I said you needed? Here is where you use it very sparingly. Use the tape to hold the gauge kit in place after lining it up. Make sure the gauge kit wiring is hanging out of the cluster and replace the plastice cover.
Go back out side. Connect Cluster harness to back of cluster. Connect gauge kit wiring to the wiring provided in the kit. Lay wires out neatly. Place the cluster back in its original spot. Replace the screws. Turn your headlamps on to test. All good? Replace all trim peices and you are done.
Somebody make this a writeup in the library, please.

(1997 cavalier) Is it possible to eliminate the black switch that comes with the euro guages(it dims the light). I want like to hook it up with the factory dimmer thats on my oem dash??? Other wise i guess ill just tape it down some where it cant be seen...........


